
Support article
Anti-spam in cPanel: how to configure Apache SpamAssassin
Learn how to enable and adjust Apache SpamAssassin in cPanel to reduce spam, mark suspicious emails and manage whitelist and blacklist rules.
Introduction
Receiving dozens of junk emails every day wastes time, uses mailbox space and increases the risk of opening dangerous messages by mistake.
In this guide you will learn how to configure Apache SpamAssassin in cPanel using the Spam Filters tool. You will see how to enable the anti-spam filter, adjust the detection level, move suspicious messages to a spam folder and create whitelist and blacklist rules for better control over your email.
The setup is simple and usually takes only a few minutes from your hosting panel.
Before you start
To follow this guide you need:
- Access to your
cPanelaccount. - At least one email account created under your domain.
- To use the mail service from your hosting account, webmail or a client such as Outlook, Thunderbird, Apple Mail or a mobile app.
Some options may vary slightly depending on the cPanel version or the server setup. If you do not see the Spam Filters tool, you can contact miHosting support to review your account.
Steps to configure Apache SpamAssassin in cPanel
1. Access cPanel
Log in to your hosting control panel with your account credentials.
Once inside, look for the Email section. There you will find tools related to email accounts, forwarders, filters, autoresponders and deliverability.
2. Open the Spam Filters tool
Click Spam Filters.
This tool is powered by Apache SpamAssassin, the system that reviews incoming messages and assigns them a score based on how likely they are to be spam.
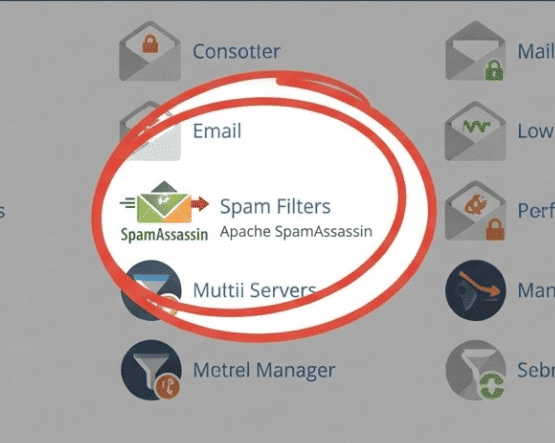
From the email section in cPanel you can open Spam Filters and manage Apache SpamAssassin directly.
3. Enable processing of new emails
Inside Spam Filters, locate the option:
Process New Emails and Mark them as Spam
Enable the switch so it stays On.
This allows cPanel to analyze incoming messages and mark suspicious emails as spam. Without this setting enabled, features such as Spam Box or Auto-Delete cannot work properly.
4. Adjust the spam score
Look for the Spam Threshold Score option.
This score defines how strict the filter will be. The lower the value, the more aggressive the filtering. The higher the value, the more permissive it becomes.
| Score | Filter level | When to use it |
|---|---|---|
| 1 to 3 | Very strict | Only if you receive too much spam and you regularly review the spam folder. |
| 4 | Moderately strict | Useful if spam still reaches you with a standard configuration. |
| 5 | Balanced | A good starting point for most accounts. |
| 6 to 10 | More permissive | Recommended if legitimate emails are being marked as spam. |
To change it:
- Click
Spam Threshold Score. - Choose the desired level.
- Save the change using the update option available in your panel.
Do not lower the score to 1 or 2 without first reviewing the results. A filter that is too aggressive may mark legitimate messages as spam, such as invoices, quotes or client emails.
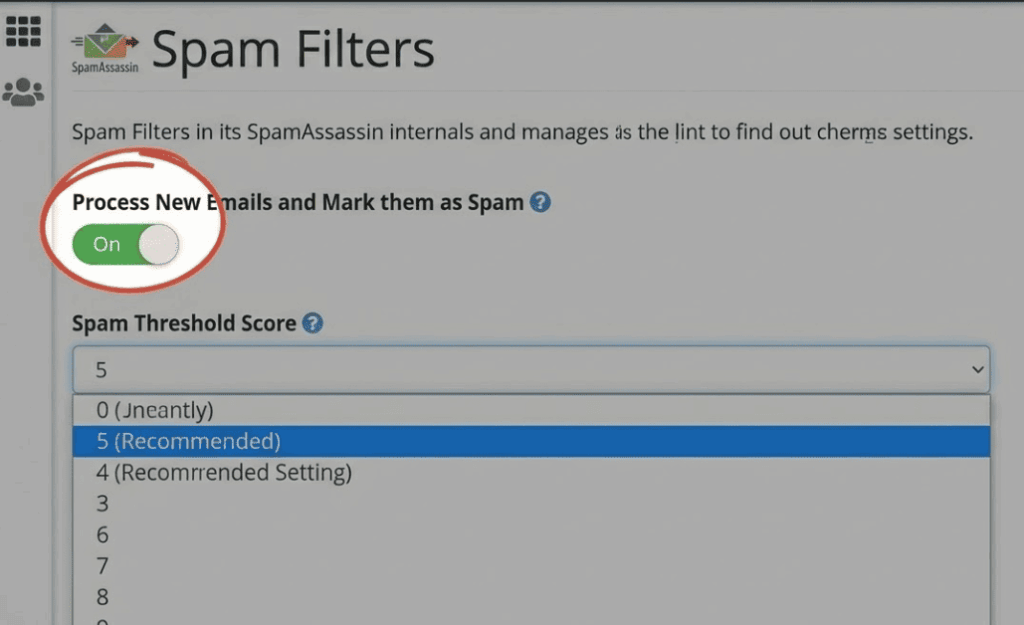
In the same screen you can turn filtering on and choose a balanced score such as 5 as your initial setting.
5. Enable Spam Box to review suspicious messages
The most recommended option when starting is Spam Box.
In cPanel it often appears as:
Move New Spam to a Separate Folder (Spam Box)
When enabled, cPanel creates a folder called spam or Spam where detected junk messages are moved.
This is useful because you can review the folder before deleting messages. If an important email was marked by mistake, you can recover it.
miHosting recommendation: enable Spam Box for a few days before using automatic deletion. That way you can confirm the configuration is working correctly.
6. Avoid enabling Auto-Delete at the beginning
The Automatically Delete New Spam (Auto-Delete) option automatically removes messages that exceed the configured deletion score.
Although it may look convenient, it should be used carefully. If a legitimate message reaches that score, it will be deleted and you will not recover it from your inbox.
Use Auto-Delete only after testing the filter for a while and confirming that important emails are not being flagged as spam.
The Auto-Delete score is separate from the main Spam Threshold Score, so review both before saving changes.
7. Configure the whitelist
To add trusted senders, scroll down to Additional Configurations.
Then open Whitelist (Emails Always Allowed).
The whitelist tells Apache SpamAssassin which addresses or domains should not be treated as spam.
Useful examples:
supplier@domain.combilling@client.com*@importantclient.com
The asterisk * works as a wildcard. For example, *@importantclient.com allows every email sent from that domain.
After adding an address, save the changes using the whitelist update option in your panel.
8. Configure the blacklist
From the same additional configuration area, open Blacklist (Emails Never Allowed).
The blacklist tells the system which addresses or domains should always be treated as spam.
Examples:
spam@suspicious-domain.com*@suspicious-domain.com
After adding an address, save the changes using the blacklist update option.
Be careful when blocking full domains. For example, *@domain.com will affect every sender from that domain.
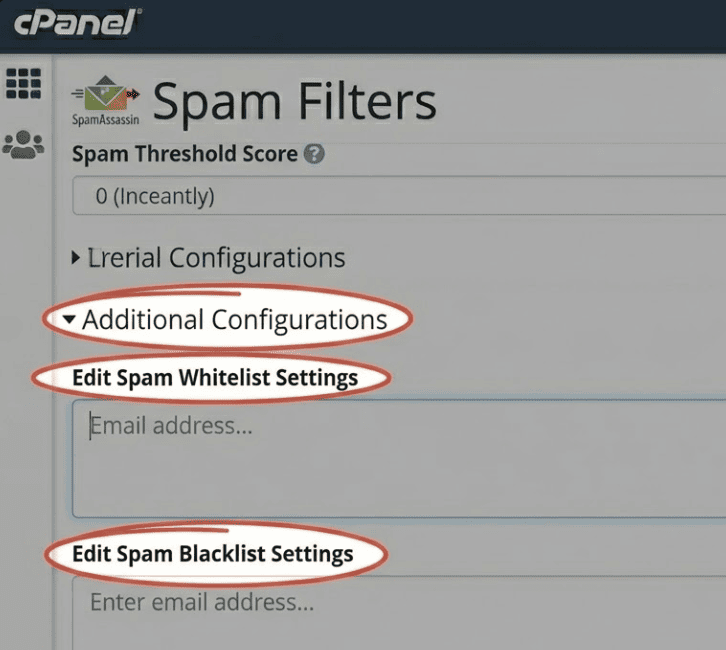
From Additional Configurations you can define trusted and blocked senders with much more precision.
9. Review your email deliverability
If you receive messages that appear to come from your own domain, it may be spoofing, meaning sender impersonation.
To reduce this issue, return to the email section in cPanel and open Email Deliverability.
Check that SPF and DKIM are correct for your domain:
SPFhelps indicate which servers are authorized to send email for your domain.DKIMadds a digital signature to confirm the message was not altered in transit.
If your domain does not use miHosting DNS or works with external DNS, you may need to copy the records suggested by cPanel and add them where your DNS zone is managed.
Useful tips
-
Start with a balanced configuration
For most accounts, a score near
5is a good starting point. If you still receive too much spam, try4. If legitimate emails are being filtered, move up to6. -
Check the Spam folder regularly
During the first few days, review the
Spamfolder to make sure important messages are not being filtered there. -
Empty the Spam folder periodically
Messages stored in Spam also take up mailbox space.
-
Do not rely only on the blacklist
Spam senders change addresses frequently. The blacklist helps, but the most effective approach is to combine it with a suitable score,
Spam Boxand properSPFandDKIMconfiguration. -
Protect your web forms
If you receive a lot of spam through contact forms, also review your website security. Adding anti-spam protection to forms, limiting repeated submissions and keeping your CMS updated can reduce the problem significantly.
FAQ
Does Apache SpamAssassin automatically delete spam
Not necessarily. First you must enable processing of new emails. Then you can choose whether suspicious messages go to Spam Box or are deleted with Auto-Delete.
When starting, the safest option is usually Spam Box.
What spam score should I use
A score of 5 is usually a good starting point. If too much junk mail still gets through, try 4. If legitimate messages are being marked as spam, try 6.
What happens if I enable Auto-Delete
Messages that reach the configured automatic deletion score will be removed. That can include legitimate emails if the settings are too strict.
Can I allow all emails from one domain
Yes. You can use a wildcard in the whitelist. For example:
*@importantclient.com
Why do I receive spam from my own address
It may be a case of sender impersonation or spoofing. It does not necessarily mean your account was hacked.
Review Email Deliverability in cPanel and make sure SPF and DKIM are configured correctly.
Conclusion
Configuring Apache SpamAssassin in cPanel helps reduce junk mail and keeps your inbox cleaner and safer.
Remember the most important points:
- Enable
Process New Emails and Mark them as Spam. - Use a balanced score, such as
5, and adjust it according to the results. - Enable
Spam Boxbefore using automatic deletion. - Add important senders to the whitelist.
- Review
SPFandDKIMinEmail Deliverabilityto improve domain protection.
If you still receive too much spam after applying these steps, or if you are unsure about the email setup, you can contact the miHosting support team.